We Need Your Vote! ❤️ We're nominated for Best Microsoft Excel Add-In at the Global Excel Awards 2025! 🌟
You can turn our nomination into a win! 🏆 If ASAP Utilities has helped you save time or work smarter in Excel, please cast your vote today. Every vote counts!
logo ASAP Utilities

Easy, fast and reliable

Excel with ASAP Utilities in it's menu

Quick Start

48 Practical Tricks to Save Hours in Excel with ASAP Utilities.

Worksheet functions

Extra worksheet functions that come with ASAP Utilities.

About ASAP Utilities

What can it do, how did it start and why is it called this way...

Manual installation

Perform a part of the installation manually.

Uninstall

How to temporary or permanently uninstall ASAP Utilities.

ASAP Utilities setup commandline parameters

The ASAP Utilities setup accepts optional command line parameters. These can be useful to system administrators, and to other programs calling the Setup program. It can also be very useful to deploy upgrades.

Setup Command Line Parameters

/SP-

Disables the This will install... Do you wish to continue? prompt at the beginning of Setup.

/SILENT, /VERYSILENT

Instructs Setup to be silent or very silent. When Setup is silent the wizard and the background window are not displayed but the installation progress window is. When a setup is very silent this installation progress window is not displayed. Everything else is normal so for example error messages during installation are displayed and the startup prompt is (if you haven't disabled it with DisableStartupPrompt or the '/SP-' command line option explained above).

If a restart is necessary and the '/NORESTART' command isn't used (see below) and Setup is silent, it will display a Reboot now? message box. If it's very silent it will reboot without asking.

/SUPPRESSMSGBOXES

Instructs Setup to suppress message boxes. Only has an effect when combined with '/SILENT' and '/VERYSILENT'.


The default response in situations where there's a choice is:

  • Yes in a 'Keep newer file?' situation.
  • No in a 'File exists, confirm overwrite.' situation.
  • Abort in Abort/Retry situations.
  • Cancel in Retry/Cancel situations.
  • Yes (=continue) in a DiskSpaceWarning/ DirExists/ DirDoesntExist/ NoUninstallWarning/ ExitSetupMessage/ ConfirmUninstall situation.
  • Yes (=restart) in a FinishedRestartMessage/ UninstalledAndNeedsRestart situation.

5 message boxes are not suppressible:

  • The About Setup message box.
  • The Exit Setup? message box.
  • The FileNotInDir2 message box displayed when Setup requires a new disk to be inserted and the disk was not found.
  • Any (error) message box displayed before Setup (or Uninstall) could read the command line parameters.
  • Any message box displayed by [Code] support function MsgBox.
/LOG

Causes the Setup to create a log file in the user's TEMP directory detailing file installation and [Run] actions taken during the installation process. This can be a helpful debugging aid. For example, if you suspect a file isn't being replaced when you believe it should be (or vice versa), the log file will tell you if the file was really skipped, and why.

The log file is created with a unique name based on the current date. (It will not overwrite or append to existing files.)

The information contained in the log file is technical in nature and therefore not intended to be understandable by end users. Nor is it designed to be machine-parseable; the format of the file is subject to change without notice.

/LOG="filename"

Same as /LOG, except it allows you to specify a fixed path/filename to use for the log file. If a file with the specified name already exists it will be overwritten. If the file cannot be created, Setup will abort with an error message.

/NOCANCEL

Prevents the user from cancelling during the installation process, by disabling the Cancel button and ignoring clicks on the close button. Useful along with '/SILENT' or '/VERYSILENT'.

/LOADINF="filename"

Instructs Setup to load the settings from the specified file after having checked the command line. This file can be prepared using the '/SAVEINF=' command as explained below.

Don't forget to use quotes if the filename contains spaces.

/SAVEINF="filename"

Instructs Setup to save installation settings to the specified file.

Don't forget to use quotes if the filename contains spaces.

/DIR="x:\dirname"

Overrides the default directory name displayed on the Select Destination Location wizard page. A fully qualified pathname must be specified.

/GROUP="folder name"

Overrides the default folder name displayed on the Select Start Menu Folder wizard page. If the [Setup] section directive DisableProgramGroupPage was set to yes, this command line parameter is ignored.

/NOICONS

Instructs Setup to initially check the Don't create a Start Menu folder check box on the Select Start Menu Folder wizard page.

/EDITION="edition type" (no longer in version 8)

This option was added in version 7.5-7.9. It allows you to choose which edition to install on systems with the 32-bit edition of Excel 2010 or later.

  • /EDITION="3264bit"
    Instructs Setup to install the universal 32+64-Bit Edition (xlam files only).
    This edition works with Excel 2010 and later both 32-bit and 64-bit editions.
  • /EDITION="32bit"
    Instructs Setup to install the 32-Bit Edition (xlam file and COM add-in/dll file).
    This edition works with the 32-bits editions of Excel 2000 and later.

/TASKS="comma separated list of task names"

Specifies a list of tasks that should be initially selected.

Only the specified tasks will be selected; the rest will be deselected. Use the /MERGETASKS parameter instead if you want to keep the default set of tasks and only select/deselect some of them.

If a task name is prefixed with a "*" character, any child tasks will be selected as well (except for those that include the dontinheritcheck flag). If a task name is prefixed with a "!" character, the task will be deselected.

This parameter does not change the state of components that include the fixed flag.

Examples:

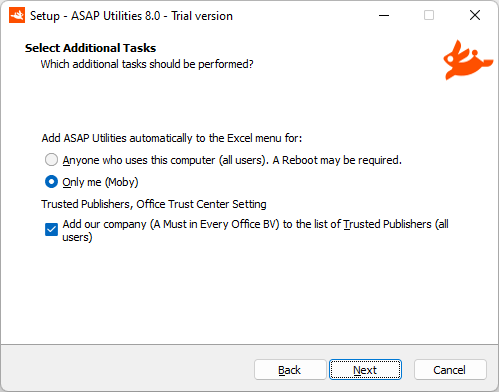
  • /TASKS="justme"
    Adds ASAP Utilities only to the Excel menu for the user that runs the setup
  • /TASKS="allusers"
    Adds ASAP Utilities to the Excel menu for all users on the system.
    ASAP Utilities will be added to the Excel menu for the other users the first time they (re) log in after the setup has run.
  • /TASKS="certificatedoadd"
    Adds our company (A Must in Every Office BV) automatically added to the List of Trusted Publishers in Excel. Add ASAP Utilities automatically to the Excel menu
The following parameters also work for the uninstaller program (unins???.exe): /SILENT, /VERYSILENT, /SUPPRESSMSGBOXES, /LOG, /LOG="filename", /NORESTART.

Entering the license details

Besides the installation you should also add the license information of every user to make sure that he/she gets the unlimited registered version and not the 90-day trial.
Entering the license details can be done via ASAP Utilities itself, or it can be automated via the registry. You can not add the license details via a commandline-parameter.
You can find the registry details for this in Chapter 3 in the ASAP Utilities User Guide or here among the setup information for the IT department.

Notes

During the normal setup you can choose between a few options.
If you run the silent install the following setup options are default:
  • Step 3; You agree with the license agreement
  • Step 6; A start menu folder is created for ASAP Utilities. You can turn this off with the /NOICONS parameter
  • Step 8;“Add ASAP Utilities automatically to the Excel menu for:”
    This value is set by default to "Anyone who uses this computer (all users)". It will install for all users on the system.
    You can change this by using the /TASKS parameter
  • Step 8“Add our company (A Must in Every Office BV) to the list of Trusted Publishers (all users);” (ASAP Utilities 5.1 and newer)
    This value is unchecked. It will not automatically add our company to the list of Trusted Publishers.
    If you want do do this manually you can use the following command (Windows Vista and newer):

    for example:
  • Step 10; At the end of the setup, Excel will not be started, nor will the readme.txt file be shown or the website openened.
  • Step 12; The license information can't be automatically added with the setup commandline parameters.
    After the installation you should also add the license information in the registry of every user to make sure they get the registered version. Here you can see where the registration information is stored in the registry
  • If the setup is run via the computer's SYSTEM account then it can sometimes happen that ASAP Utilities is not added to the Windows Start menu because the (start menu)folder does not exist for the SYSTEM account. We've seen this happen in Windows 10. If you use the /LOG parameter, then you will be notified of this in the log file in case this happens (Warning: SHGetFolderPath failed with code 0x80070002 on folder 0x8002, The path to the Programs folder on the Start Menu, {user programs}, was not found. The setup continues but the start menu icons cannot be created).

Helper programs

By request, we've create a few small 'helper' programs.
These programs can also be run silently with the above mentioned commandline switches.
Below programs do not require any special admin rights. (Changes are only made to the current user part of the registry.)
  • Add_ASAP_Utilities_to_the_Excel_menu.zip (607 KB)
    Add ASAP Utilities to the Excel menu for the (Windows) user account that runs it.
    Helpful if you have chosen to not automatically add ASAP Utilities to the Excel menu for all users.
  • Remove_ASAP_Utilities_from_the_Excel_menu.zip (573 KB)
    Removes ASAP Utilities from the Excel menu for the (Windows) user account that runs it.
    Useful if you made a mistake or want to transfer it from one user to another user on the server.
  • Remove_ASAPUtilities_License.zip (464 KB)
    Removes the license from the (Windows) user account that runs it.
    Useful when you want to transfer the license from one user to another without uninstalling (for example on a server).


Home Privacy Policy Cookie Policy EULA Download All added Excel tools Sitemap Contact Us


Empowering Excel Users Worldwide for 26 Years